Monday 31 January 2011

Daughters Birthday

Today is my eldest daughters Birthday, I have made this card for her(I hope she doesn't read this blog before she receives the card!).
It is A4 in size and the basic card stock is cream 300gsm from Payper box(as always).
The cardstock has been covered with Basic Grey Julia and it is stitched randomly around the edges. The focal point is the circle, this is a piece of chipboard from a game that I have covered with BG Sari and punched holes in around part of the circle. Using some glass flower stems and the white grassy stuff that came with it from Cargo I have stuck and stitched this onto the circle. The words Daughter has been die cut from Sizzix Mango Tango alphabet in pink Bazill cardstock. To make the "Daughter" look like its floating in mid air I have cut off a cello bag and cut it shorter in width so that the letters over hang so that the cello bag is hardly visible, this was then glued onto the circle. Using white flowers, hat pin and beads from Stampin UP(Alison will be able to get these for you) from the pretties kit arrange as you wish around the circle. Circle is attached using foam pads, add your tiny tag with words of your choice, I have used Doodlebugs Simply sweet in brown rub-ons. As this card is very heavy due to the stems being glass I have added an extra thickness of cardstock to the inside back of the card for extra strength and stability. I hope my daughter likes it and hope you crafters do too?

Thursday 27 January 2011

Bits n bobs

For me, January is quite a month for Birthdays, and I don't know about you but sometimes inspiration seems to disappear? I am also trying to be less wasteful with my stash and keep a box of bits n bobs that are left over from other projects and my aim is to use these pieces to make more cards. Have you ever tried that? Hard isn't it? Now, I don't want you to think that my friends and family aren't special, nothing could be further from the truth, but I am finding that doing the bits n bobs method you do tend to create cards that are similar in design. Enough of my ramblings..here is what I used.
Basic card is hammered white from Payper Box cut to 51/2" square, Pink mirri card and then Basic Grey Julia and Sari for the background and strip. I have matted and layered the mirri and sari together and stitched around the edges before sticking it to the main body of the card. Using the BG Julia I cut a strip and used the Martha Stewart scallop punch to create the border strip and again stitched the design on before sticking it to the matted papers. Using the Stamping Up Upsy Daisy set(available from Alison at SU) I stamped the image on white cardstock with Pink Passion SU ink and stitched freestyle around in random shapes a few times. I like random as you will notice throughout my designs. Add a glittery brad to one corner and then stick this onto the card and add a gem on one of the stamped flowers. Tie around the border strip some pink rafia, arrange and glue on some Prima flowers, add some pink pearls to centres. With a tiny tag add your sentiment using Doodle Bug rub ons, simply sweet in pink. Take a pearl hat pin and push this in towards the flower arrangement and with wire tie on your tiny tag and secure tag with a foam pad. now as they say, the jobs a good un! Until next time...happy crafting.x

Saturday 22 January 2011

Discreet Birthday

One of my close friends had her special birthday yesterday and I don't know about you but there seems nothing on the market that has a discreet age tag on the cards? So, I set about making Geraldine a very special card(I hope she forgives me when she reads this blog?). I have made this card A4, go big when it's special! I have stitched together 2 pieces of A4 cream card with a silver strip, this forms the basis of the card. I was very inspired by the black flock swirl when I saw it, doesn't it look fab? This my crafty friends is from packaging, so check out what you throw out, there are some hidden gems to be had! I stitched around two sides in black thread. Then using the black inner packing of the box I stitched that onto the card. Using a strip of the white packaging gloss card I made a flap, I wanted to hide the workings of where i was going to stitch on the beaded black flowers(I prefer stitching to gluing as I find its more secure). Using the Sizzix alphabet Round Table I cut from the black packaging the words. Add gems onto the corners and using a small white tag i put the discreet age tag using Doodlebugs Simply sweet Rub-ons. I think it looks amazing, a special card for a special lady.

Monday 17 January 2011

One Little Word


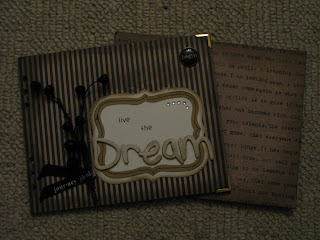
I have been enrolled on the online Ali Edwards workshop (aliedwards.com) by my great friend Sarah(Scrapsy). If like me, you are new to the concept of choosing one word at the beginning of each year and living by your powerful word, then I will be blogging my journey of OLW(one little word). My word is "Live the DREAM". My dream is to make my craft the majority of my life rather than the minority. One aspect of my dream was to have a blog so that I can keep a record of what I create but more importantly to share my techniques and ideas with you. I have started my OLW by creating my front & back covers of my journal, I used my stash but if you would like to know what I used then here is the list-

7 Gypsies naked wire album(7.25" x 5.75")

7 Gypsies Kit from Scrapsy, set includes-

4" x 4" 7 Gypsies naked wire album

3 x 12" x 12" papers- I used Awning & Kraft Vie

Typewriter word charms- I used Begin & End

Ribbon- Journey

Gold corner plates


Also needed-

Anitas Tacky glue-for gluing papers to chipboard covers

Glossy Accents- for gluing charms and die cut words together

Distress Ink-Burlap-for around the edges

Alcohol ink-Rust- for the corner plates

Beaded flowers from Cargo

Sizzix dies-Mango Tango Alphabet, Back ornate frame and ornate frame

Rub -Ons- Doodlebug simply sweet in black

Gems


So, what are you waiting for? Choose your word wisely and start living it!! X

Tuesday 11 January 2011

My first time..


Hi fellow crafters, as this is my first time blogging, I hope you will be gentle with me?
Most of us Make New Years resolutions and by now we have all but given up on them, sound familiar? Maybe we just need to be kind to ourselves and set an achievable target? With this in mind I wanted to be more organised this year and so thought i would make a card box. As you can see its from using items that i had around the house as I am a bit of a frugal crafter(who isn't?) This is a lovely project to ease you back into crafting and a guilt free one, no money spent on this one. I have used an Ikea box as the base and covered some of the sides with a textured white cardstock but you can use whatever you have to hand. On the front is a Tim Holtz ornate frame(love his stuff!) and inside I have made "files" from A4 cardstock that I have glued together and cut down. The 7gyspy metal tabs are from Scrapsy-see my blog link below. On each of the month section files I have printed off the month numbers and stitched them to the file-so I don't loose them. The section at the back has been made from chipboard so I have a large space for my Christmas cards this also holds stamps, pen, pencil and rubber. I used pencil to write in the Birthdays and Anniversaries and any additions I can then rub it out and squeeze it all on one line. I love this box. The only thing I would like to change is to add some of the Tim Holtz feet, but since I didn't have any it could not have any. Have fun creating this. x